How SuperTab plugins work
Plugins add live information to your SuperTab panel: CPU and memory, free disk space, the status of your Git projects — or anything else a small script can print.
SuperTab reads the same plugin format as xbar and SwiftBar, so most ready-made plugins from their catalogs work here without changes. Plugins that lean on features beyond the basic format may need a small adjustment.
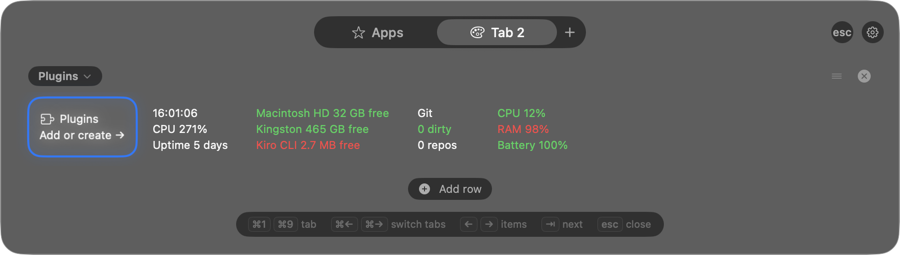
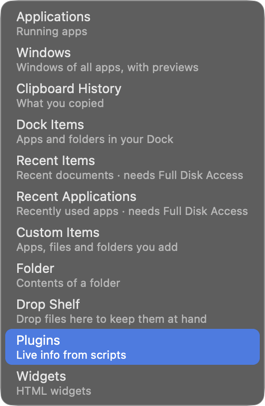
Add a Plugins row
Two ways:
- Click Add row at the bottom of the panel and choose Plugins from the menu of row types.
- Or click the name of a row you already have and choose Type → Plugins.
The row shows the built-in plugins right away. Click a plugin to see more details and actions.
Built-in plugins
- System — CPU, memory, and battery.
- Disk — free space on your disks.
- Git — how many of your projects have uncommitted changes. To choose the folder it watches, click the plugin, choose Edit Plugin, and change the folder on the first lines.
The Plugins tile
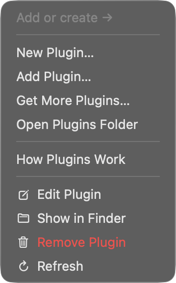
Every Plugins row has one tile of its own, marked with a puzzle icon: Plugins — Add or create →. Click it and a menu opens:
- New Plugin…
- Add Plugin…
- Get More Plugins…
- Open Plugins Folder
- How Plugins Work — this page.
Add more plugins
A ready-made plugin from the catalog
- Click the row name and choose Get More Plugins…. The xbar plugin catalog opens in your browser.
- Open a category — for example Dev or System — and click the plugin you like. You’ll see its file, ending in
.sh,.py, or similar. - Click the Download raw file button (the arrow icon above the code) to save the plugin to your Downloads folder.
- Back in SuperTab, click the row name and choose Add Plugin…, then select the file you downloaded.
- The new plugin appears in the row with New plugin — click to allow. Click it and confirm.
The plugin starts showing its information within a few seconds.
Some plugins need a setting before they work — a folder, a city, or an account key. Their description in the catalog says so. Click the plugin, choose Edit Plugin, and fill it in on the first lines of the file.
Your own plugin
Choose New Plugin… — from the Plugins tile or from the row menu. A window asks for two things:
- Name — what the plugin will be called.
- Update every — 10 seconds, 30 seconds, 1 minute, 5 minutes, or 1 hour.
SuperTab creates a ready-to-edit plugin in the row and opens the file in your editor. Change the text and save. Click the plugin and choose Refresh to see the result right away.
A plugin you created with New Plugin… keeps working after you edit it. A plugin that came from somewhere else — added with Add Plugin… or dropped into the folder — asks to be allowed again every time its file changes.
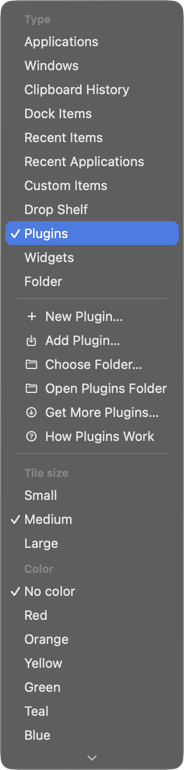
Manage plugins
Click a plugin to find:
- Edit Plugin — open it in your text editor.
- Show in Finder
- Remove Plugin — moves it to the Trash.
- Refresh
Several rows of plugins
Each new Plugins row gets a folder of its own — Plugins 2, Plugins 3 and so on — with its own copy of the example plugins. Removing a plugin in one row does not touch the others. The first Plugins row keeps the folder it always had. To point a row at a different folder, click the row name and choose Choose Folder…. To jump straight to a row’s folder in Finder, choose Open Plugins Folder from the same menu. Each row can also have its own tile size.
Plugins and widgets
A widget can read what a plugin already produced — that is how the built-in plugin-bars widget draws CPU, RAM and battery without running a script of its own. If you want to show a plugin’s output as a drawing rather than as lines of text, see how widgets work.
Write your own plugin
A plugin is a small script that prints lines of text. The first lines — up to three — appear on the tile; everything after a --- line appears when you click it.
#!/bin/sh
echo "Hello"
echo "---"
echo "Open SuperTab page | href=https://noteifyapp.com/supertab/"
The number in the file name sets how often it updates: hello.1m.sh runs every minute, hello.10s.sh every 10 seconds.
For the full format — colors, icons, menus, actions — see the plugin guide by SwiftBar: https://github.com/swiftbar/SwiftBar#plugin-api
Browse ready-made plugins: https://github.com/matryer/xbar-plugins